They’re the minutes from the “27th meeting of the General Conference on Weights and Measures”, published by the International Bureau of Weights and Measures. Skip to page 19 for English.
Resolution 1 is a slow start. It notes “the increasingly multidisciplinary nature of measurement in new or disruptive technologies, and the new requirements for metrology in digital technologies, sensor networks, and big data,” and sets up some working groups. That’s metrology – the scientific study of measurement – not meteorology.
Resolution 2 considers that while everybody is chasing digital transformation, our existing SI unit system (basically the metric system) isn’t going to cut it for much longer. Specifically, “maintaining and building confidence in the accuracy and global comparability of measurements will require the creation of a full digital representation of the SI, including robust, unambiguous, and machine-actionable representations of measurement units, values and uncertainties”.
Resolution 3 says the data scientists have been busy generating bigger and smaller numbers, using orders of magnitude in excess of 1024. The ol’ kilo/mega/giga prefixes are comparatively tiny these days. Unofficial new prefix names have taken hold, so we should probably make them official. Introducing: ronna/R (1027), ronto/r (10-27), quetta/Q (1030), and quecto/q (10-30).
Resolution 4 just casually starts to redefine time. Most countries run time based off UTC and a time zone offset. Every four years we throw in a bonus day to keep the calendar lined up with Earth’s orbit: a leap day. There’s a smaller effect that most people don’t know about though, and that’s the leap second. This exists because we currently have a rule that UTC must stay in agreement with another time system, known as UT1, which is based on the angular rotation of Earth. Whenever the Earth is approaching 0.9 seconds ahead, the UTC clock gets shoved forward by 1 second to catch up. This is enacted using a process defined by the International Telecommunication Union (what‽). It doesn’t happen on a regular schedule like every 4 years; it happens whenever the International Earth Rotation and Reference Systems Service says it needs to happen, which makes it a nightmare to plan for. It’s also really hard to do without crashing everything; few software packages expect to see 61 seconds in a minute. Google and Amazon achieve it in their cloud environments by “smearing” the extra second in over the course of a whole day. If that didn’t all sound hard enough already, here’s the real kicker: the Earth’s rotation is slowing down, and we might soon need to do our first ever negative leap second. What could possibly go wrong? The resolution is to buy ourselves time (boom-tish) by increasing the allowable variance, and to come up with a new model that will work for at least the next century. Whilst pragmatic, it’s a bit sad that computers are forcing us to disconnect our concepts of time and space.
Resolution 5 keeps up the pace on redefining time, by saying that our definition for a second isn’t good enough anymore either. In 1967, the second was defined as “the duration of 9 192 631 770 periods of the radiation corresponding to the transition between the two hyperfine levels of the ground state of the caesium 133 atom”. In 2018, they rearranged the math, but stuck with the underlying physics. Our measurement tools now far surpass the definition. The solution is: a competition! Competitors (countries) must bring their proposals to the next meeting (in 2026), so that a new definition can be adopted at the following meeting (in 2030). How many stakeholder alignment meetings do you think occur in the run-up to those‽
Resolution 6 is basically a recruitment drive for world domination, so that the metric system may provide global sanity. There were 48 member countries in 1999, and there are 64 now. The last time the US had a functioning government, their view was to provide no useful opinion, and leave metric adoption entirely to individual consumer choice.
Resolution 7 lays out the fees for countries to stay involved: €13m/yr.
What a fascinating document.
—
Header photo taken while we were camping somewhere along the Birdsville Track, in July 2021. The trees in the foreground are lit by our campfire.
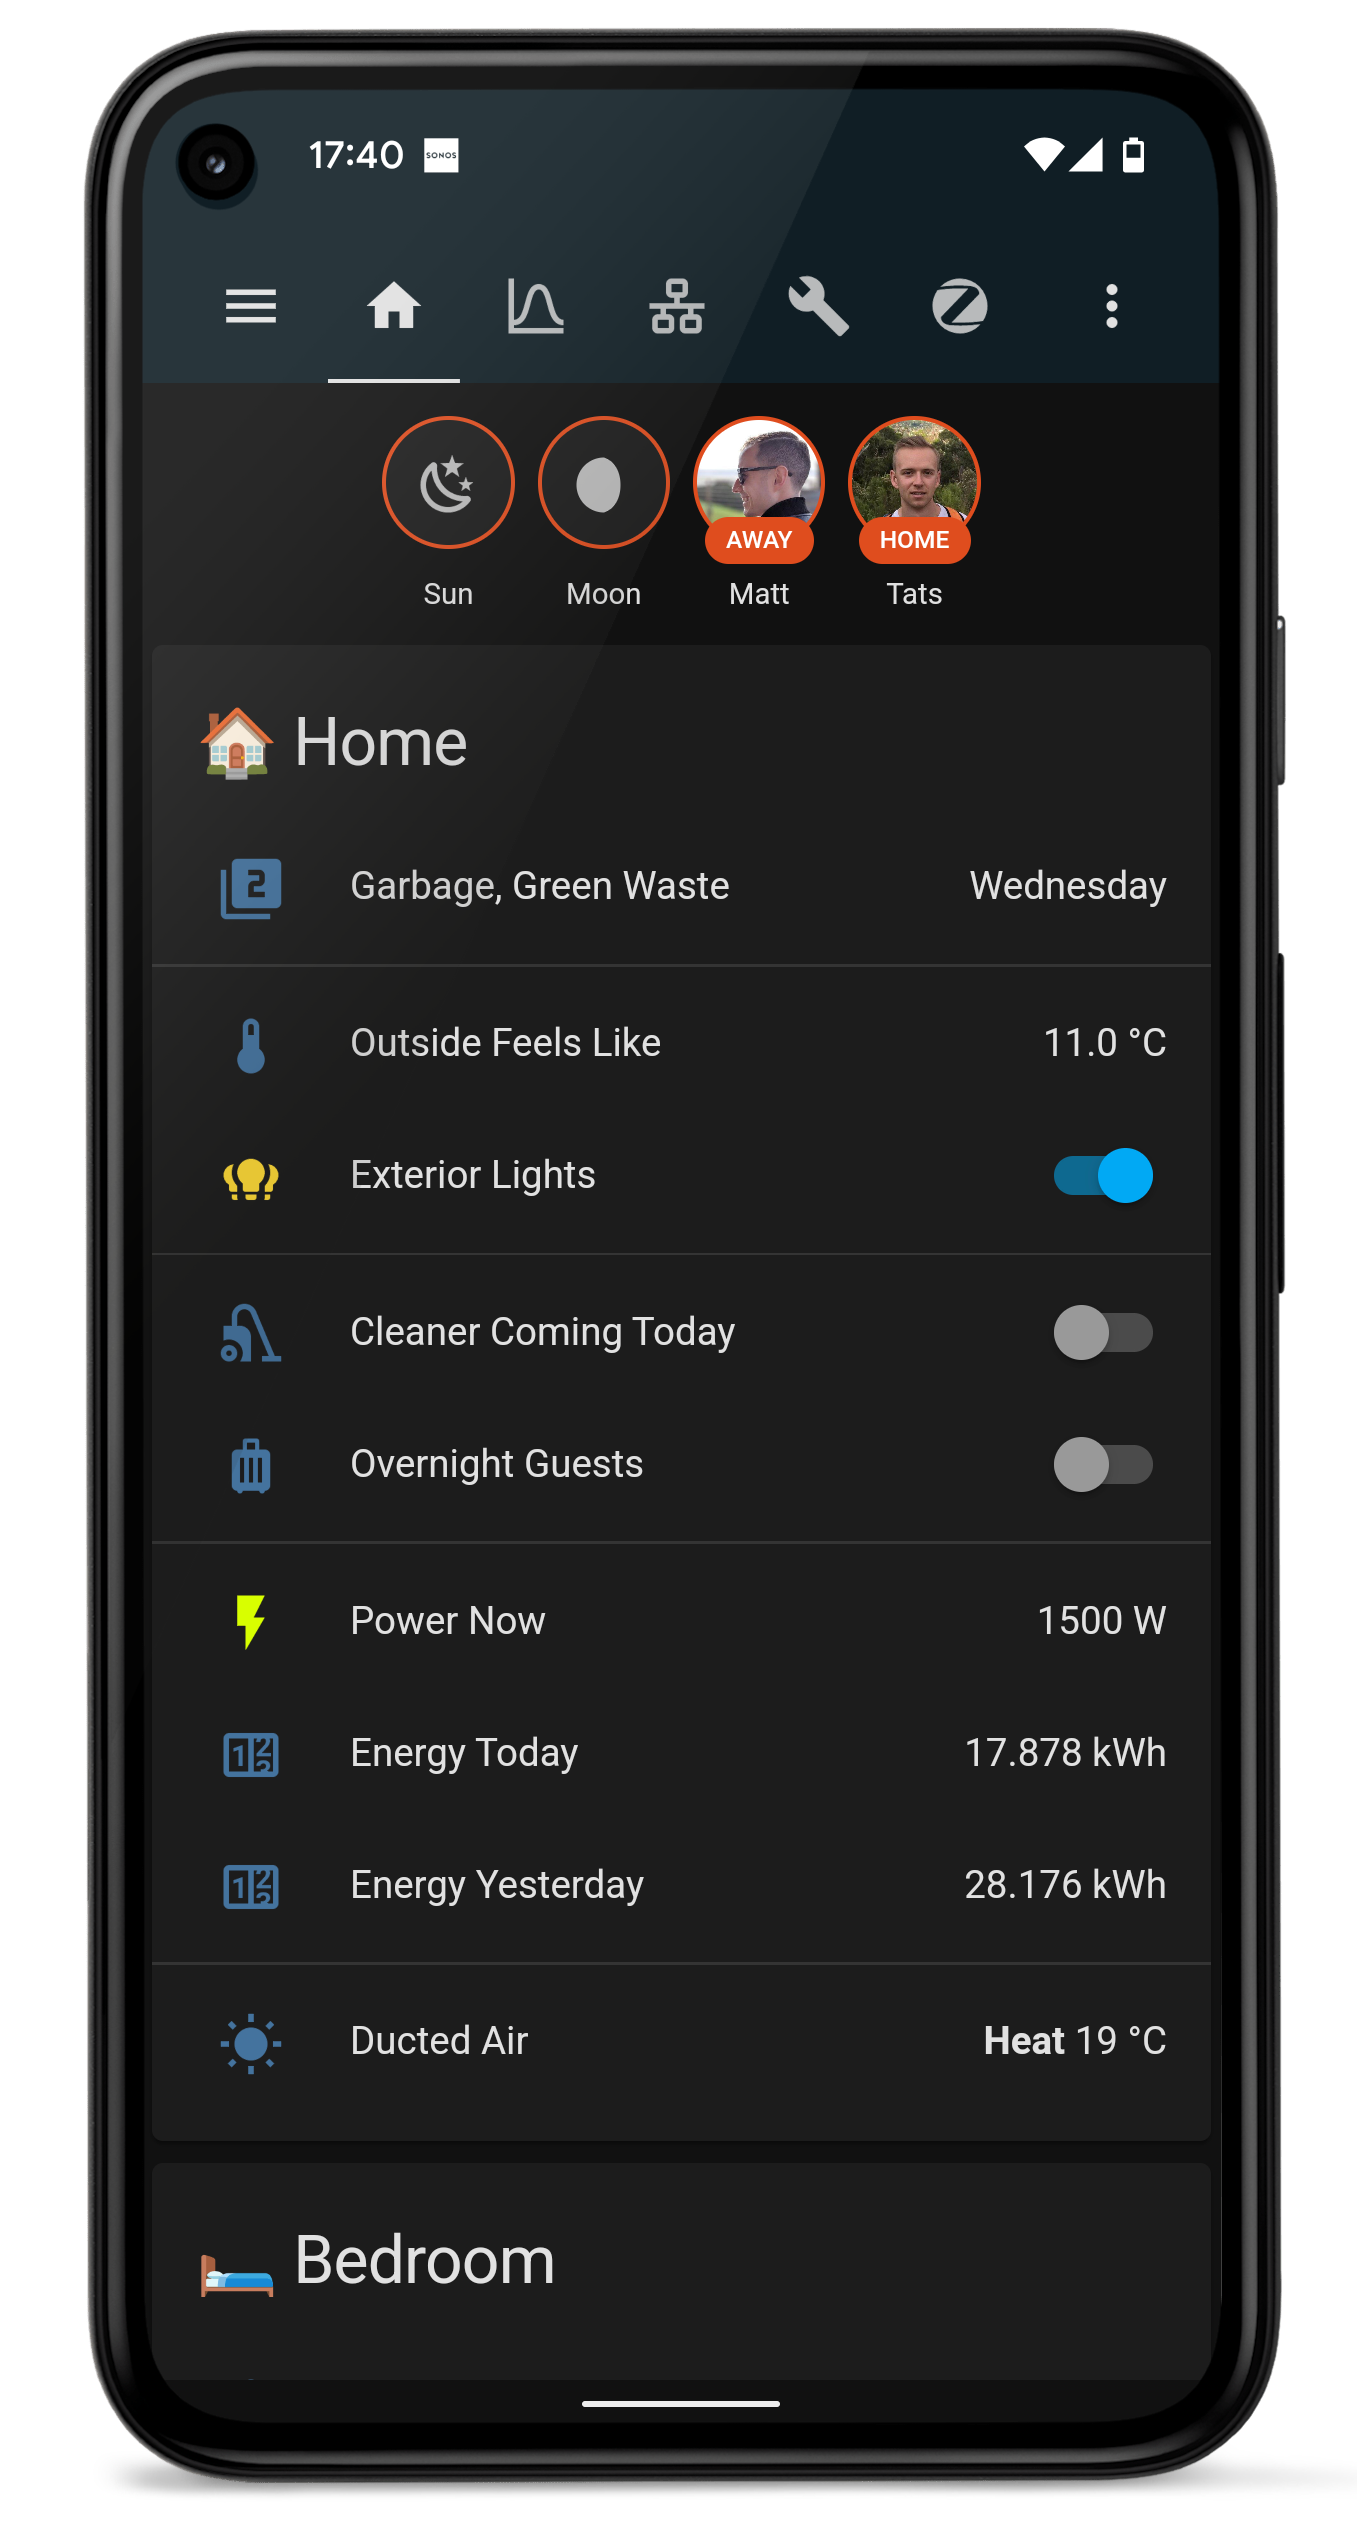
We’ve recently been learning more about the energy usage through our home in Melbourne, Australia. We’re still on the first lap around the sun with this house, so each month brings a new experience of how it behaves.
Whilst we chip away at draught sealing, and slower projects like insulation and window improvements, we wanted to at least optimise how we were using energy, and in particular, electricity.
Smart Meters – What We Have
All houses in Victoria have a smart meter, which constantly reports back intra-day usage data. This is then user-accessible via the chosen retailer.
It’s kind of interesting, because you don’t get a bill surprise six-weeks after you used the energy, but it’s not very granular. Reporting is in 30-minute blocks and delayed. This means you’re stuck looking at very high-level trends. It makes sense considering the volume of meter data that needs to get pushed around and aggregated between all the mesh-connected smart meters, but it’s not a great user experience.
We currently use Powershop, who expose both data export and a few visualisations, like this heatmap:
Screenshot of Powershop’s energy history heatmap visualisation
Smart Meters – What We Could Have
The smart meters deployed in Victoria also support local Zigbee connectivity.
That’s the same underlying protocol that other smart devices like Phillips Hue already use, which would make it excellent for surfacing local, real-time energy information directly into a home automation platform.
One intended use of the Zigbee capability is to support the connection of an in-home display, so that you can have something like this Rainforest EMU-2 sitting in a visible area of the home:
In-home displays (IHDs) are devices that give a visual indication of how much energy the home is using and what it is costing at any given time, using data transmitted from a smart meter or submeter. Most of us never go near our electricity meters, so we cannot easily see how quickly the registers or the numbers on the display are changing. Even if you could, it would still be difficult to work out how much electricity you are using, how much it is costing, and whether it is more or less than it was an hour, a week, or a year ago. If your home is on a time-of-use tariff, the display will help you to know exactly when one price period ends and the next one starts, which can be hard to remember.
IHDs can bring all this information inside your home, or onto your computer and smart phone, in a form that is easy to understand. The simplest IHDs indicate with coloured lights or symbols, whether you are in a high, medium or low price period, to help you decide whether to run high-load appliances such as vacuum cleaners. An IHD of this type needs to know only the clock time and time-of-use tariff schedule, which can be pre-programmed.
I don’t want a separate screen; I just want to get the data flowing into my home automation platform. There is a well-defined specification for the “ZigBee Smart Energy Profile 1.1”, and we already have a Zigbee ecosystem in the house.
The first thing I found was that the pairing process was the inverse of what I expected. I thought I would take our existing Zigbee coordinator, put it into pairing mode, and then somehow tell the smart meter to join. What I discovered was that the smart meter acts as a coordinator, and everything else gets added as a client. In retrospect, this does make some good sense: it means that people just need to add an in-home display, and not a separate hub in the middle.
The next thing I discovered is that the smart meter’s coordinator is centrally controlled. There’s no way to directly trigger a pairing process on it. This seems to be the global standard in how these devices work.
Specifically, it’s done via the energy distributor. For us, that’s Citipower/Powercor, who provide distribution for ~1.2 million Victorian homes.
Regardless of which retailer you’re using, you can establish an account directly on their myEnergy portal. (If you’re on a different Victorian distribution network, here’s a handy list of equivalent portals.)
A Home Area Network (HAN) device, such as an In-home display, can be used to wirelessly access near real-time and historical electricity consumption information directly from your meter (interval ‘smart meter’). myEnergy provides you access to your meter to authorise the connection of one or more HAN devices. Please have your device MAC address and Installation code details ready and select ‘Connect HAN device’ to begin the process.
The connection form prompts for:
NMI (National Meter Identifier)
Meter serial number
Device – one of:
Percepsion IHD
Chameleon IHD
Pipit 500 IHD
Intercel eKo IHD
Planet Innovation USB dongle
Rainforest Eagle Gateway
Other In-Home Display
Other Load Control Device
Other Load Smart Thermostat
Other Range Extender
Other Smart Appliance
MAC address
Installation code – 16-digit hexadecimal
Nickname
For me, the most compelling device in this list is the Rainforest Eagle Gateway. It can act as bridge between the smart meter’s Zigbee network, and a local ethernet environment.
This type of integration seems compelling, but the devices are an expensive step. They aren’t actively promoted in Australia, so I wonder how well the distributor would support them if I was to track down some stock.
The whole Home Area Network / In-home Display ecosystem looks like a massively underutilised capability of the smart meter network, that’s just sitting dormant right now.
I parked this route while I explored a more locally advertised solution first.
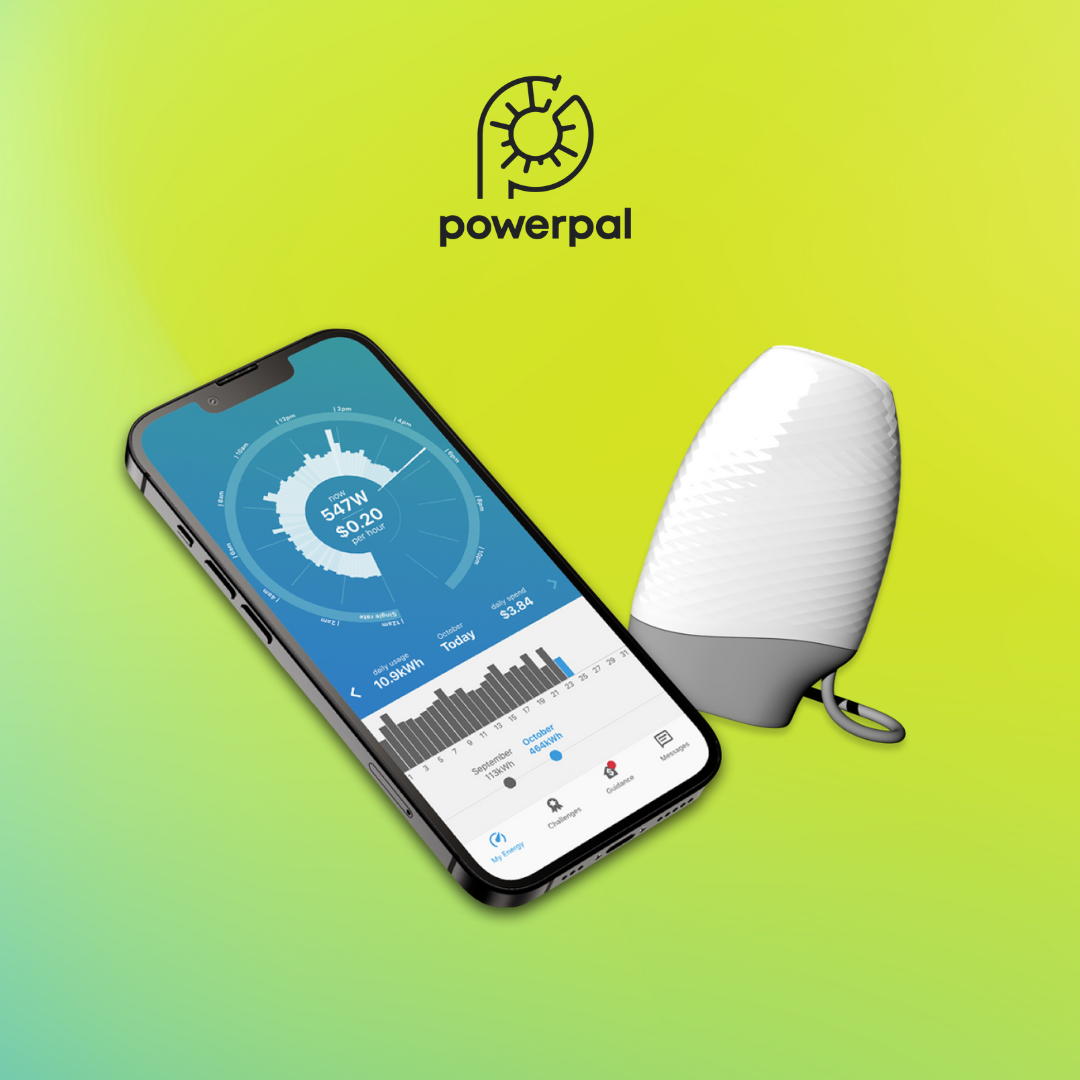
Powerpal
Powerpal devices aim to solve the in-home display challenge, without the distributor lockdown and pairing hurdles. Their tag line is “See, optimise and control your power usage in real-time.”
It’s a small device that connects directly to the meter, and then exposes real-time usage information over Bluetooth LE to a corresponding mobile app.
Powerpal marketing image
The physical integration is so incredibly simple: the meter has a red LED that blinks on a defined interval, and they just stick a sensor on top of it which counts the blinks. For our meter, it’s one blink per watt-hour (Wh) of energy. (It says “1 Wh / imp” on the front of the meter.)
Our smart meter with the Powerpal installed
The device itself is battery powered, as paradoxically the one place that you usually don’t have an easy wired power source is at your meter. Thanks to the magic of Bluetooth LE, it has an expected lifespan of 3-5 years.
The whole thing fits inside our existing meter housing (* once I took the drill to the inside of the door to route out just a little more depth for the sensor):
It’s a managed install, as they need to demonstrate that it’s working to claim the government rebate. I signed up on their website at 7am on a Tuesday, had the installer turn up at noon on Thursday, and it was all done in under 10 minutes.
With the first real-time insights (~10 second interval) into our usage, it was then incredibly easy to just walk around the house turning specific appliances on and off and seeing their specific draw. It wasn’t practical to do this type of isolation with the previous 30-minute reporting window.
This kept us entertained for a while, but we also had to learn to stop looking at it. It’s very real-time, so it’s easy to get jumpy about things which draw a high amount of power for a short time (OMG THE TOSTER IS ON!!!), or to optimise to a world where you have low energy usage but you’re also just cold.
The insights are good, but the Bluetooth LE connectivity brings several restrictions: you must have your phone in range of the meter, you can only have one phone connected at a time, and it’s not integrated with the rest of our home automation ecosystem so there’s no easy way to correlate historical usage with what else has been happening around the house.
It’s a good-enough solution, and great for mass-market access, but we wanted something more integrated.
Home Assistant Energy
We use the fabulous Home Assistant platform to run all our automation. It’s open source, exceedingly capable, and very actively maintained (top ten project on GitHub). It can be deployed on a Raspberry Pi, or there’s Home Assistant Yellow – first-party hardware that wraps a Raspberry Pi Compute Module with extra smart home radios (Zigbee, OpenThread).
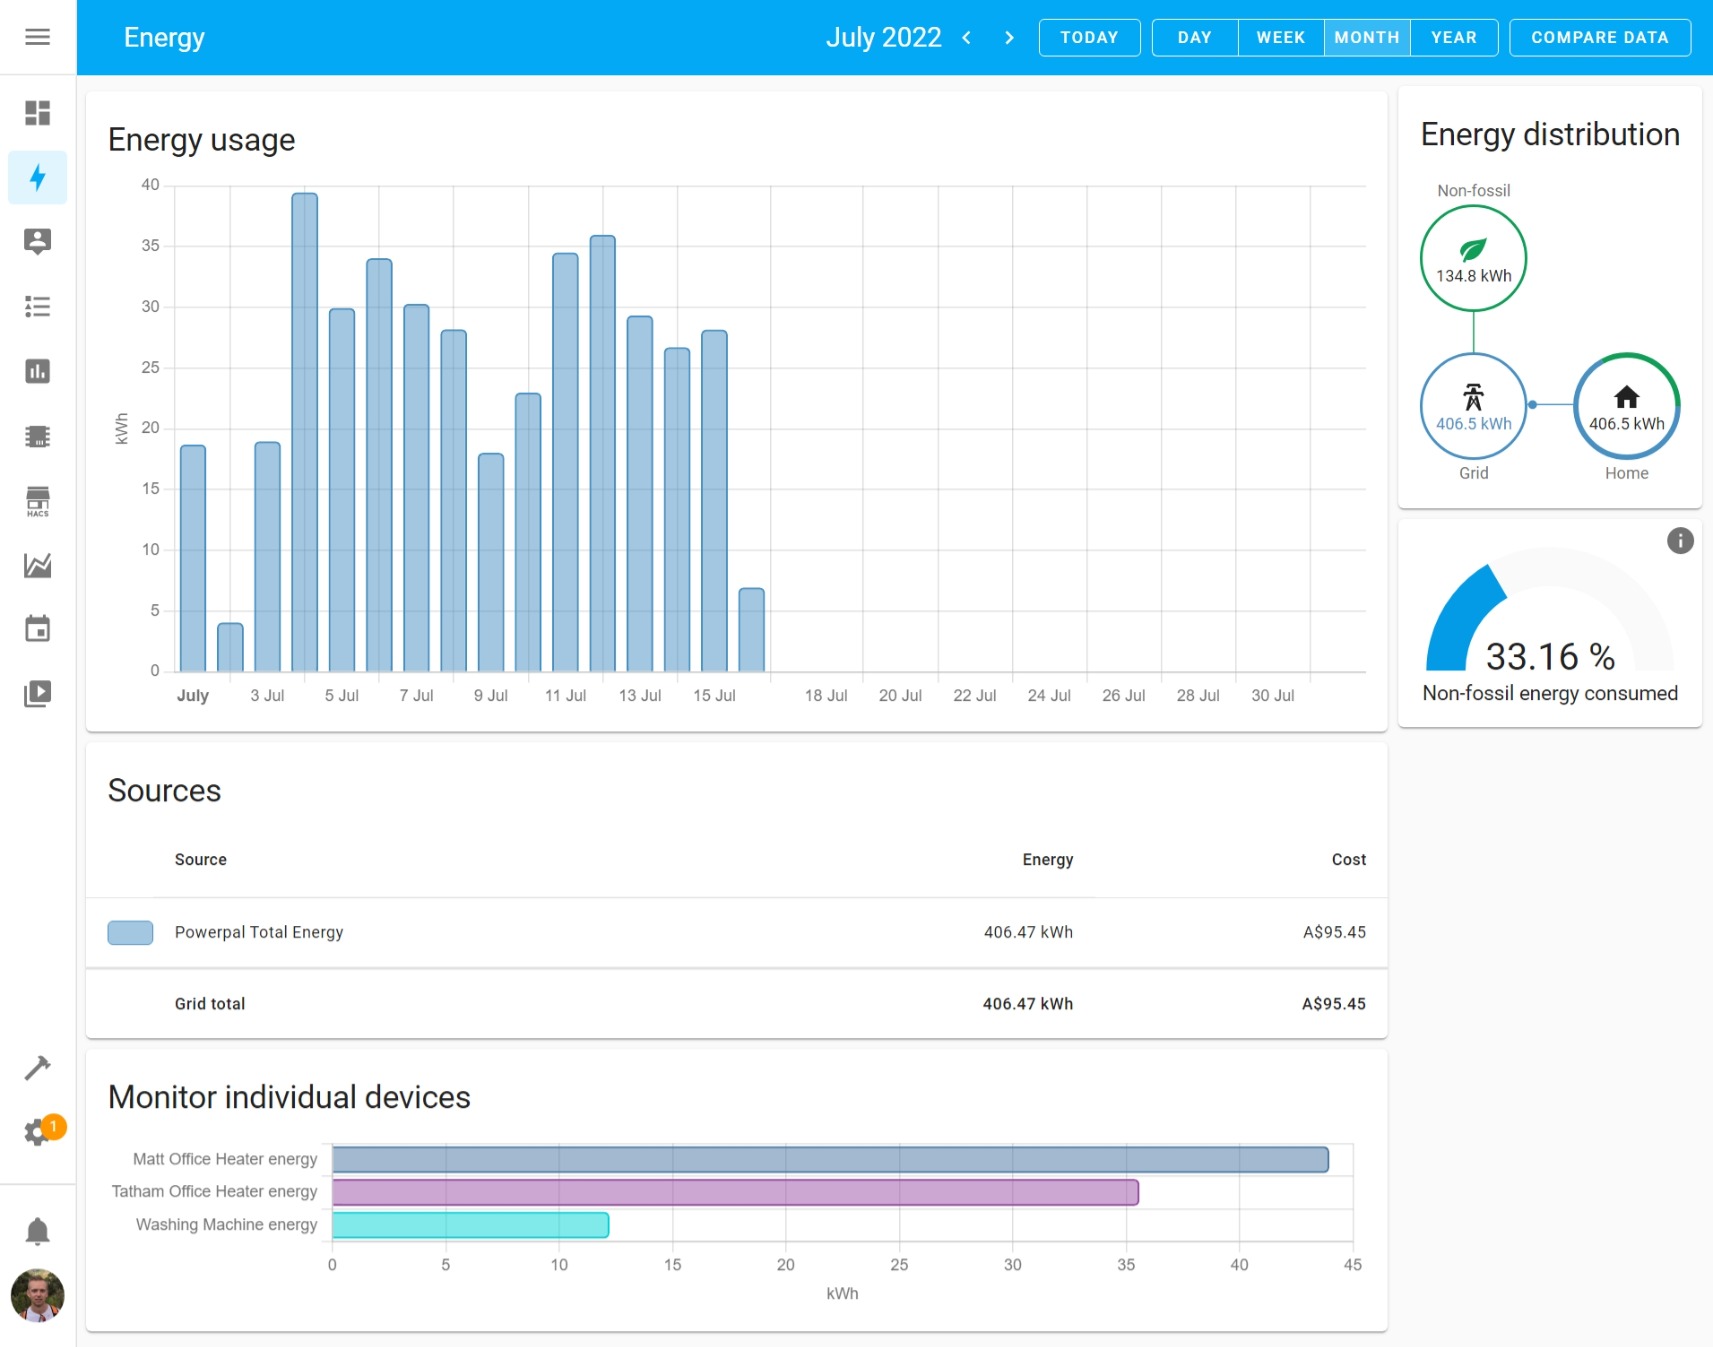
We’re still exceptionally early in our adoption of this capability, but we now at least have our grid-consumption and some specific load monitoring integrated:
Screenshot of our Home Assistant Energy Dashboard
In addition to all of the real-time sensors, data is also aggregated hourly, daily, weekly, and monthly. We can compare periods with prior periods. The dashboard here is just building on standard sensor entities within the Home Assistant ecosystem, so they can all be used to drive automations as well.
The “non-fossil energy” is defined as sources like solar, wind, hydro, and nuclear. Home Assistant sources this information from a service called CO2signal, for our specific part of the grid. Even though we’re paying for 100% renewable energy via Powershop’s GreenPower, we still consume from the same grid as everyone else, so the mix changes throughout the day, and it’s interesting / horrifying to capture that number over time.
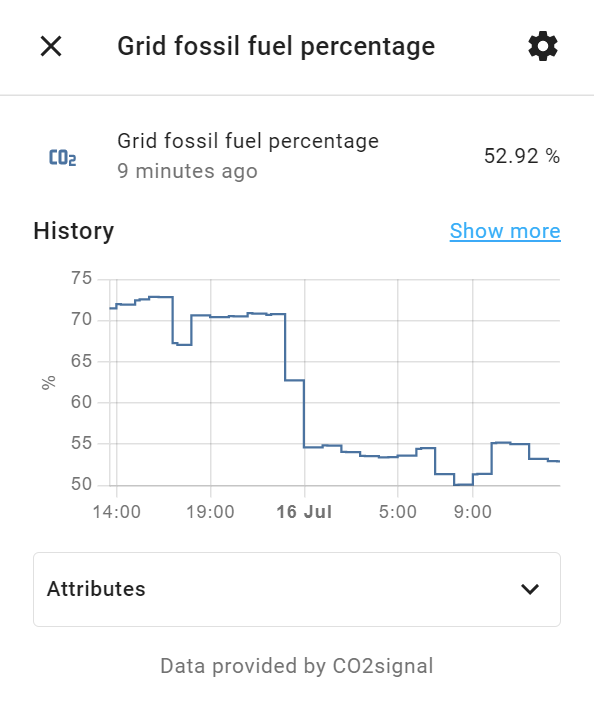
The CO2signal data is exposed as sensor.grid_fossil_fuel_percentage (%) and sensor.co2_intensity (gCO2eq/kWh), so they can be individually plotted, and used to drive alerts or automations however we see fit:
Home Assistant entity view for sensor.grid_fossil_fuel_percentage
But where does the grid consumption and individual load data come from?
Load Monitoring
For specific high-power appliances, we’ve added Aeotec Smart Plugs to them. These are Zigbee-based smart plugs with built-in energy monitoring.
Aeotec Smart Plug
For panel heaters in our offices, we’re able to automate them turning on when we’re working from home and monitor the power (real-time) and energy (cumulative).
By having it all in the same platform as the rest of our home automation, we’re able to mash up this data with other sensors. This view is showing the power consumption of our heaters yesterday, along side temperature data from those same rooms, our front porch, and the nearest Bureau of Meteorology observations at Melbourne Olympic Park:
Screenshot of Home Assistant history view for specific entities
We can also use this data to detect what appliances are doing, like when the washing machine has finished. We have an automation that triggers when the machine starts using power, then waits until it has used no power for 5 minutes. After that, it sends a push notification to our phones. Here’s the YAML version of that automation, but the same could easily be configured in the UI if that’s more your jam:
This file contains hidden or bidirectional Unicode text that may be interpreted or compiled differently than what appears below. To review, open the file in an editor that reveals hidden Unicode characters.
Learn more about bidirectional Unicode characters
⚠️ Update Jan 2024: The code used in this section has atrophied, since ESPHome did a big push around Bluetooth capability in 2023 and changed some signatures. The example below won’t compile on ESPHome since build ~2022.12. I have not put any effort into fixing this, as my local firmware remained stable for quite a while after, and I have subsequently stopped using Powerpal. (We installed solar in Apr 2023 and re-did all of the energy integrations then.) The concepts in this section remain valid, so you can always give it a go and update the code yourself.
The other part of the puzzle was to get Powerpal data flowing through to Home Assistant.
I mentioned earlier in the post that the Powerpal device only exposes data over Bluetooth LE, to one device, which is great for a simple consumer setup but is quite restrictive for what we wanted to achieve.
There’s an article on their support site stating that they’re working on an API, and they specifically name Home Assistant as a target platform. To do this, they’re exploring a Bluetooth LE to Wi-Fi bridge as a separate device. (There’s no way that the device itself could directly connect to Wi-Fi otherwise the battery life would drop from 3-5 years to 3-5 hours.) There’s a beta signup form, which I filled in maybe six months ago, but I have no sense of how fast they’re progressing this, so I’m not holding my breath waiting.
There’s also a big red block of text that says you should absolutely not attempt to tamper with the existing Bluetooth LE connectivity, citing “potential data security risks”.
Let’s do that. Red text always sounds exciting.
Considering it’s all local communication, I don’t really see how Powerpal can stop me here, and it’s all extremely low risk work as there’s no active control of anything.
Time to make our own Powerpal-compatible (but totally not tampering) Wi-Fi bridge!
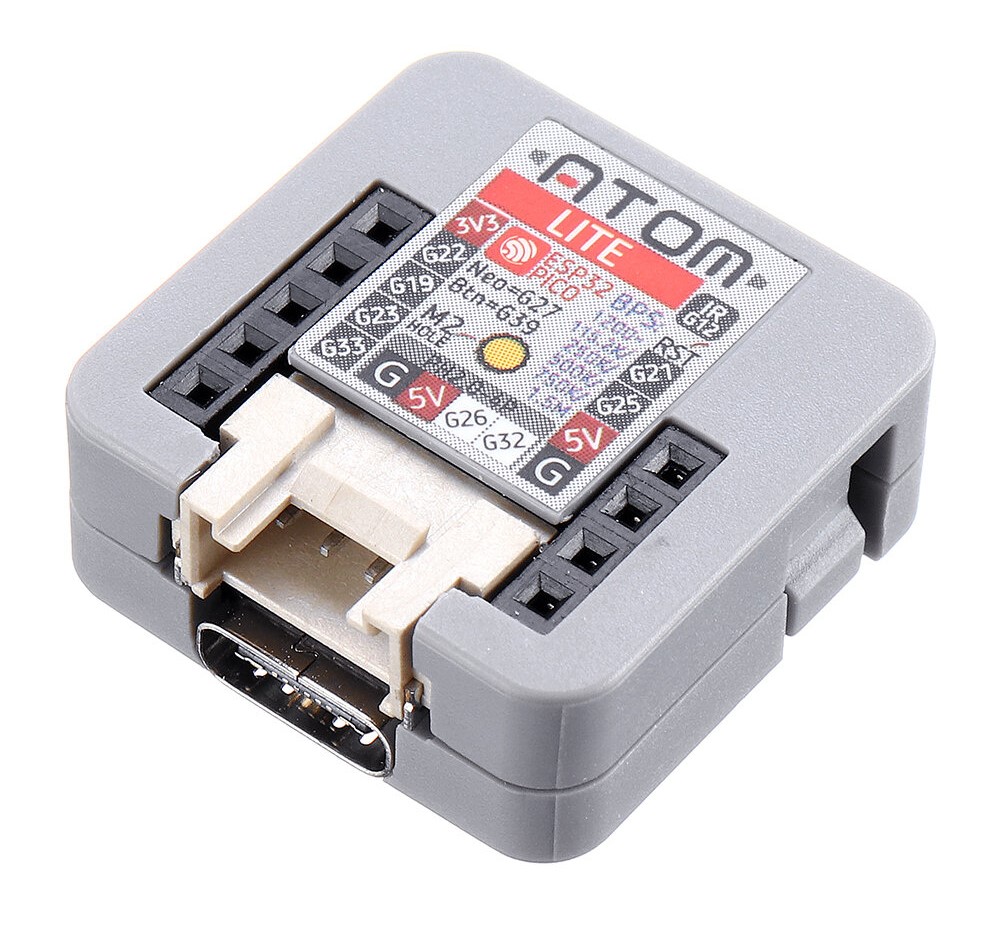
The device I’m using is an M5Stack Atom Lite. They’re US$7.50, tiny (24x24x10mm!), and USB-C powered. I’ve written about the versatility of them before. The chipset in them – an ESP32 – sports a 240MHz dual core processor, and a dual-stack Bluetooth + Wi-Fi radio, so it covers everything we need.
M5Stack Atom Lite
To make the firmware for it, I’m going to use ESPHome. This project is specifically focussed on making it really easy to generate firmware for ESP8266 or ESP32-based devices to talk to Home Assistant. You basically just give it a config file, and it does the rest. Getting going is as easy as installing the ESPHome Add-on in Home Assistant.
In my local instance of ESPHome, I created a new device called powerpal_gateway. Then, in just 45 lines of config, we can describe everything we need to generate the gateway’s firmware. If you’re a beginner to this type of thing, you can just copy-paste this whole block into ESPHome.
This file contains hidden or bidirectional Unicode text that may be interpreted or compiled differently than what appears below. To review, open the file in an editor that reveals hidden Unicode characters.
Learn more about bidirectional Unicode characters
This file contains hidden or bidirectional Unicode text that may be interpreted or compiled differently than what appears below. To review, open the file in an editor that reveals hidden Unicode characters.
Learn more about bidirectional Unicode characters
We need to provide the Powerpal’s MAC address (physically printed on it), and the pairing code (supplied on a card when you get it). That’s all that’s required to authenticate. As a matter of practice, I split these secrets out into separate variables. There’s a “Secrets” button top-right in the ESPHome web interface to manage them.
For the first time loading firmware on to the M5Stack, we need to plug it into a laptop. Then, in ESPHome, we can choose the device > Install > Plug into this computer. ESPHome will take care of pulling in all of the dependencies, compiling them into a firmware binary, and then helping us flash them onto the device right from the browser (using Web Serial).
We also need to make sure our phone is disconnected from the Powerpal, otherwise our new gateway won’t be able to connect, so it’s a good idea at this step to either turn Bluetooth off on the phone, or just go ahead and uninstall the Powerpal app entirely.
After that first flash, the device can be disconnected from the laptop, and just plugged into any regular USB power brick. Future firmware updates can be done wirelessly / over-the-air. At this point, I moved the new gateway to its permanent home in an out-of-sight location near the front hall, so it had good proximity to the meter box.
Once the new gateway has a minute or so to power up and negotiate with everything, we start seeing data feeding into Home Assistant. Success!
Screenshot of Home Assistant device page for the gateway
Now that the sensors are available, we can add them to Home Assistant’s energy dashboard via Home Assistant > Settings > Dashboards > Energy > Electricity Grid > Add Consumption. You’ll need to wait until the hour turns over (e.g., 10:00, 11:00, etc.) before the first batch of statistics gets calculated and everything really shows up.
The “Total Energy” measure resets to zero each time the M5Stack boots up. This is mostly fine, as it should be a very rare event anyway, and Home Assistant’s statistics platform knows how to handle it, as the sensor is defined as a ‘monotonically increasing total’. If you need to unplug the device to move it or something, then the lowest data loss path is to do it across the end of the hour (e.g., unplug it at 10:58 and have it powered back up by 11:02).
We also added the real-time power usage, today’s energy, and yesterday’s energy, to the main dashboard. (Create a Utility Meter helper to get the daily sensors. It’s ~10 clicks.) That replaces the Powerpal app for us, and brings energy into our single pane of glass experience:
Real screenshot from our Home Assistant mobile app experience
Summary
Just these few data points were a huge step for us to understand and optimise our electricity usage.
Considering the Powerpal was free, the only cost to integrate the grid energy data was the US$7.50 M5Stack. The Aeotec smart plugs were a bit more expensive (~AU$50 each), and we already had the Home Assistant instance running.
We now have environmental (temperature, humidity) and energy data into the same platform, so we can do smart automations and analysis in the one place.
We’re building longitudinal data. (Home Assistant feeds out to InfluxDB if you want as well.)
We’re able to monitor this from multiple devices, anywhere, anytime, thanks to Home Assistant acting as the broker, and Home Assistant Cloud for remote access. This is a marked improvement on the one-device-within-10m starting position of the Powerpal.
We’ve still got a lot further that we want to go. We’re installing solar next. I’m looking at the Schneider PowerTag range for circuit-level monitoring of the air conditioning. I’d like to bring in an intra-day view of our gas consumption.
And, like all smart home projects, it has just been nerdy fun to get this far. 🤓 None of this had to be done, but it could be done, so we did.
Jan 2024 Addendum
We installed solar in April 2023, powered by Enphase micro-inverters. This system provides data around solar production, house consumption, and grid import/export, based on a set of CT clamps connected to the Enphase Envoy controller. This data is then exposed over a nice, local-network API, on a 10sec refresh rate. We now use this data to power the energy dashboards in Home Assistant instead and have decommissioned our dependency on Powerpal. The best Wi-Fi setup for infrastructure is an Ethernet cable; I ran one to where the Enphase Envoy controller was being installed and never gave the installers any Wi-Fi details. Reliable, wired data, over a documented local API: win.
We also bought a farm last year and were back at the start line for energy monitoring on the property. A fresh HA instance, and a blank canvas for integration! We’ve deployed a Shelly Pro 3EM into the main board. This is a DIN-mount energy monitor, with three CT clamps, and a local-network API, on a 1sec refresh rate. The CT clamps are then clipped around existing AC circuits. The property only has single-phase, but we use the three CT clamps to measure: a) grid import/export, b) solar generation, and c) house usage (a separate circuit, which is a subset of the broader property). Again, the best Wi-Fi setup for infrastructure is an Ethernet cable, which the Shelly Pro 3EM supports. Reliable, wired data, over a documented local API: win. The only downsides to this device are cost (AU$200), and the need for a qualified sparky to install it.
Home Assistant has in-box / native support for both of these devices. As soon as they show up on your network, HA will auto-detect them and offer to bring them in.
At Readify yesterday, I saw two different co-workers encounter the same issue within a few hours of each other. Time for a blog post!
Scenario
Problem 1:
I’m trying to use Power BI AAD App Registration to access Power BI REST API using ClientId and Key. The idea is to automate Power BI publishing activities through VSTS without a need of using my OrgId credentials. Pretty much I follow this guide but in PowerShell. The registration through https://dev.powerbi.com/apps sets the app registration up and configures API scopes. I’m able to get a JWT but when I call any of Power BI endpoints I’m getting 401 Unauthorised response. I’ve checked JWT and it’s valid but much different from the one I’m getting using my OrgId.
Problem 2:
Anyone familiar with App Registrations in Azure? Specifically I’m trying to figure out how to call the Graph API (using AppID and secret key generated on the portal), to query for any user’s group memberships. We already have an app registration that works. I’m trying to replicate what it’s doing. The end result is that while I can obtain a token for my new registration, trying to access group membership gives an unauthorized error. I have tried checking every permission under delegated permissions but it doesn’t seem to do the trick.
They were both trying to:
Create an app registration in AAD
Grab the client ID and secret
Immediately use these secrets to make API calls as the application (not on behalf of a user)
Base Principles
App Registrations
AAD has the concept of App Registrations. These are essentially a manifest file that describes what an application is, what its endpoints are, and what permissions it needs to operate.
It’s easiest to think of app registrations from the perspective of a multi-tenant SaaS app. There’s an organisation who publishes an application, then multiple organisations who use that app. App registrations are the publisher side of this story. They’re like the marketplace listing for the app.
App registrations are made/hosted against a tenant which represents the publisher of the app. For example, “MegaAwesome App” by Readify would have its app registration in the readify.onmicrosoft.com directory. This is a single, global registration for this app across all of AAD, regardless of how many organisations use the app.
These are like ‘instances’ of the application, or ‘subscriptions’. In the multi-tenant SaaS app scenario, each consumer gets an Enterprise App defined.
The enterprise app entry describes whether the specific app is even approved for use or not, what permissions have actually been granted, and which users or groups have been assigned access.
Grants permission for the app to access specific Contoso resources
Grants permission for specific Contoso users/groups to access the app
Defines access requirements for how Contoso users access the app (i.e. Conditional Access rules around MFA, device registration, and MDM compliance)
Might override the app name or logo, to rebrand how it displays in navigation experiences like https://myapps.microsoft.com.
If we take the multi-tenant SaaS scenario away, and just focus on an internal app in our own org, all we do is put both entries in the same tenant:
Org: readify.onmicrosoft.com
App Registration for ‘MegaAwesome App’
Defined by development team
Enterprise App for ‘MegaAwesome App by Readify’
Controlled by Readify’s IT admins (not dev team)
The App Registration and the Enterprise App then represent the internal split between the dev team and the IT/security team who own the directory.
Consent
This is (mostly) how an enterprise app instance gets created.
The first time an app is used by a subscriber tenant, the enterprise app entry is created. Some form of consent is required before the app actually gets any permissions to that subscriber tenant though.
Depending on the permissions requested in the app registration or login flow, consent might come from the end user, or might require a tenant admin.
In an interactive / web-based login flow, the user will see the consent prompt after the sign-in screen, but before they’re redirected back to the app.
Our Problem
In the scenario that both of my co-workers were hitting, they had:
Created an app registration
Grabbed the app’s client ID and secret
Tried to make an API call using those values
Failed with a 401 Unauthorised response
Because they weren’t redirecting a user off to the login endpoint, there was no user-interactive login flow, and thus no opportunity for the enterprise app entry to be created or for consent to be provided.
Basic Solution
You can jump straight to the consent prompt via this super-easy to remember, magical URL:
You fill in the values for your tenant, app client ID, and requested resource ID, then just visit this URL in a browser once. The redirect URI and nonce don’t matter as it’s only yourself being redirect there after the consent has been granted.
Requiring a user to visit a one-time magical URL to setup an app is prone to failure. Somebody will inevitably want to deploy the app/script to another environment, or change a permission, and then wonder why everything is broken even though the app registrations are exactly the same.
In scripts that rely on app-based authentication, I like to include a self-test for each resource. This self-test does a basic read-only API call to assert that the required permissions are there, then provides a useful error if they aren’t, including a pre-built consent URL. Anybody running the script or reviewing logs can browse straight to the link without needing to understand the full details of what we’ve just been through earlier in this post.
This file contains hidden or bidirectional Unicode text that may be interpreted or compiled differently than what appears below. To review, open the file in an editor that reveals hidden Unicode characters. Learn more about bidirectional Unicode characters
Where possible, act on behalf of a user rather than using the generic app secret to make API calls. This makes for an easier consent flow in most cases, and gives a better audit log of who’s done what rather than just which app did something.
Further, try to avoid actually storing the app client ID and secret anywhere. They become another magical set of credentials that aren’t attributed to any particular user, and that don’t get rotated with any real frequency. To bootstrap them into your app, rather than storing them in config, look at solutions like Managed Service Identity. This lets AAD manage the service principal and inject it into your app’s configuration context at runtime.
Short screencasts are a key technique in my overall communication toolbox.
I like to use them to communicate complex messages, where the background is often even more important than the actual outcome.
They allow us to share complex ideas in a way that people can consume asynchronously. As an example, right now we’re rolling out our Readify FY18 plans as a series of 10-minute chapters.
They also prevent people from skim-reading and missing context. I design the length of the video to be the time investment required of somebody. (Here’s an idea. Want an opinion? You need to invest at least X minutes of your time to hear it out first. Otherwise, you’re wasting both of our time.) Typically 5 – 10 minutes are good sized chunks. If somebody comments “I haven’t watched the video, but…“, then I’m quite comfortable to suggest that I’ll give them the 5 – 10 minutes to go and actually watch the video, and then I’ll be willing to discuss it when they’re done.
Of course, screencasts are just one communication technique. Earlier in the FY18 planning process, when there were ideas flying everywhere, we shared the content as mostly raw meeting notes and bullet point dumps. We shared with the expectation that people would skim-read at best, and that that was ok: they would call out the areas they wanted to talk about in any detail.
Previous Tools
PowerPoint’s own recording tools aren’t great. They’re designed for narrated slides, rather than a recorded presentation, and there are some subtle but awkward differences there. The prime one is that they store the audio track as a separate recording on each slide, resulting in a silent gap at each slide transition. I usually talk over the slide transitions to bridge the content, which ends up sounding terrible. It also trashes your PPTX file by putting auto-advance time stamps all through it (because that’s how they move to the next audio block).
I used to use a tool called SnagIt. It was nice and simple, with a reasonable price point (~$50), however it hasn’t progressed to the world of 4K screens. On a Surface Pro 4, this means you’re stuck with only ¼ of your screen fitting in the maximum viewport, or you have to stuff around with changing screen resolution every time you want to record.
Native Windows 10 Tools
With Windows 10, you can now produce a decent output just using built-in tools in the OS. Some of the features aren’t so obvious though, hence this post to share how I stitch them all together
In most cases, we’ll only be recording a single app – like PowerPoint, or a web browser. These instructions assume that’s the case. If you want to toggle back and forth between multiple apps, then you’ll need to fall back to a third party app like SnagIt or Camtasia.
💭 Give these steps a go as you read through this post. You’ll just record the browser here, but you’ll get to see how it all hangs together.
Quiet Hours
The last thing you need is an awkward IM during your recording. Even if it’s completely innocuous, it’ll make you stumble mid-sentence. Turn on Quiet Hours to silence those notifications.
You’ll still need to exit non-Store apps, like Outlook and Skype of Business. Until they’re upgraded to the world of UWP, they just blissfully ignore this setting.
Game Bar
Windows 10 includes a built-in Game DVR as part of the Xbox integration. We’re going to trick that into being more broadly useful for us.
First, launch the app you want to record, such as PowerPoint.
Then hit ⌨ Win+G to launch the Xbox Game bar. (G is for Game.)
The first time you do this, poor old Windows is rightly going to be a little confused about you launching the Xbox controls over the top of PowerPoint:
Just tick that box to say “Yes, this is a game”, and you’ll get the full set of controls:
And now you know how I unwind of an evening. PowerPoint! Woo!
Start Recording
You’ll need to explicitly tick the “Record mic” box each time, as it’s normally optimised just to record the game audio, and not the user.
Then, just hit the big, red, record button. 🔴
The Game bar won’t be part of the recording, so don’t worry if it sticks around on the screen.
Sometimes, the “Record mic” box unchecks itself again after you start recording. Double check that it’s still checked (filled in) before you power into your recording.
Clear Audio
We’re not aiming for TV broadcast quality here, but we do want to get decent audio that’s not going to annoy listeners. With a few simple tips, you can usually achieve that without buying a special mic or stapling egg cartons to the wall.
Aim for a larger room, preferably with softer furnishings. In an office, this is probably a larger boardroom with the blinds down. At home, it’s probably your bedroom (seriously, the blankets and pillows are perfect!). A small meeting room isn’t a deal breaker, but it’ll definitely sound like you’re talking in a bucket.
Start off by clearing your throat, then saying something at a normal volume. “Hi, I’m talking to myself”. Pause for a few seconds, then start your actual content. This technique will cause the automatic volume levelling on your mic to kick in and sort itself out. We’ll trim this off later.
Sit central to the laptop that you’re recording on. Most modern laptops have stereo microphones in them, so if you talk at it side-on then your audience will only hear you side-on.
Keep the energy up. The normal pacing techniques that you’d use for a live presentation don’t apply here; they just leave people to get distracted. If it feels like you’re racing through your content and talking too fast, then it’s probably about right.
Stop Recording
Leave at last a few seconds of silence at the end. There’s no rush to stop the recording, because we’ll trim the end anyway.
If the Game bar is still on screen, you can just click the Stop button.
If it disappeared, press Win+G again to bring it back first.
Recording Location
You’ll find the recording under Videos, then Captures.
While it was recording, Windows was just focussed on capturing everything really quickly. It didn’t want to use up CPU cycles that might cause a hiccup to the game that we were playing. As a result, the file will be huge, because it hasn’t been optimised at all. We’ll fix that next.
Trim + Optimize
Right click the video, then Open With > Photos. Yes, really, the Photos app, not the Film & TV app. That’s because the Photos app includes a video trimming tool:
Even the smallest amount of trimming will let you then save a new copy of the video:
This time, Windows will work harder to generate a much smaller file. For recordings of slides and apps, you’ll generally see the file size reduce by 95% or more, which makes it immensely easier to distribute.
The smaller file will appear in the Captures folder, next to the original.
Three Takes Tops
Screencasts should be easy and natural for you to produce, so don’t make them a big event.
I like to restrict myself to three takes max:
The first one is just a test. I know I’ll throw it away. It’s useful to test the audio, mumble my way through the slides, and think about what I’m going to say.
The second take might be real. I try for it to be real. If I say ‘um’ or ‘ah’, it’s ok – it’s natural speaking style – and I keep going. I definitely try not to say ‘oh crap, I totally stuffed it’ because that just completely trashes the recording and forces you to restart. If this take is good enough, then we’re done and dusted. More often than not though, I stuff this one up majorly by getting slides in the wrong order, or getting my message wrong.
The third take must be real. Any more effort than this is too much effort.
This means than a 10 minutes presentation should take ~30 mins to record. I usually book out an hour, so that I then have time left to upload the recording to Office 365 Video and post it out to Yammer.
No doubt, your first few attempts will take a bit longer while you’re learning both the tools and the style. That’s ok; just avoid getting stuck in infinite takes. Once you hit about five takes in a single sitting, it’s time to pack it up and take a break. Your voice will need a rest, and you’ll likely be muddled up about what points you have or haven’t said in any given take.
Disable Game Bar
While the game mode is enabled, even when you’re not recording, PowerPoint is running in a bit of an odd state that it’s not used to. Your whole PC will probably feel a bit sluggish.
To disable it again:
Return to PowerPoint (or whatever app you were recording)
Hit ⌨ Win+G to launch the Game bar again
Click Settings
Untick “Remember this as a game”
Then, your PC will be as good as it was to begin with.
We’re in the transition seasons in both hemispheres right now: autumn in the south, and spring in the north. This is a good time to establish a new crop of plants before the conditions get too harsh in the peak seasons.
In our house, we wanted to replace the under-loved front courtyard with a basic vegetable garden that will produce some winter greens. We’re only talking about a small urban space here, but it’s amazing how much you can produce from that, and just how much it improves the look of the space.
First, we built a simple raised bed: 1.8m x 1.4m, and around 20cm deep. Minimal tools were required, as the hardware store cut the wood to size for us, so we just had to screw some brackets into each corner and dig them in with a basic hand trowel. We covered the existing dirt with some soaked cardboard as a weed and nutrient barrier before loading in the new potting mix (80%) and manure (20%).
The next challenge was to work out what plants we wanted. We had an idea – leafy winter greens – however garden bed planning always runs into a challenge when you consider companions and enemies. Companion planting is especially important in shared beds, where plants can compete with each other, send each other out of balance, or strive for success together.
This process has always been quite manual and annoying. As soon as you start reading about one plant, you’ll quickly find that it’s not compatible with something else you had planned, and it’s back to rearranging everything again. My mother has slowly compiled the Excel-sheet-to-end-all-Excel-sheets, saving on browser-tab-fatigue, however it’s still a laborious process to apply to a brand new garden. (And that’s if you even know everything you want to plant in the first place!)
Of course, the solution was to pause here and build a simple Windows 10 app:
As you drag-and-drop plants onto the bed planner, the app constantly recalculates what will and won’t be compatible.
The list of potential plants is automatically sorted to hint “Great Companions” and “Good Companions” first, and push those sneaky enemies to the bottom of the queue.
This also means that you can use it somewhat like Spotify Radio: just pick one plant you really want (say, basil), and drag it on to the bed planner. The list of potential plants will instantly suggest capsicum or tomatoes as the ideal plants to add next. Just keep adding from the top of the list and you’ll have a perfect garden in no time.
It also renders basic sizing and spacing information, so you can get an idea of what will actually fit in your space.
With the app built, our optimum winter garden is now well on its way to success. Hopefully yours can be too!
The article explores the relevance of ‘dedicated’ IoT systems, like GE’s Predix.
I’d like to expand on this quote:
“The opportunity of IoT lies in integrating physical intelligence right through to business processes, and back out again”
Much of the current discussion around IoT is focussed on cheap sensors, platform interoperability, and data analytics. These are all important building blocks, but they don’t really talk to the power of IoT for me.
We’ve spent two decades mashing up databases. Disconnected datasets now annoy even our least technical friends.
We spent the last decade mashing up web services. It’s mind boggling that I can add a high-quality, interactive map with global coverage straight into an app, and then spend longer trying to generate all the different icon sizes required to publish it.
We’ll spend this decade mashing up the physical world. We’re nearing the point that it’s as easy to connect to your toothbrush as it is to connect to a web service.
Software remains at the heart of all this: it’s just that we can now reach further than ever before. Rather than waiting for input data, we can just go and get it. Rather than sending an alert, we can just go and start/stop/repair/move/etc. whatever we need to.
Separately, it was encouraging to see security raised several times. A device that’s too small and dumb to run the math required for encryption is probably not something to be exposed to the public internet.
And of course, it’s always nice to see Readify’s name alongside the likes of Intel, GE, and CSIRO. 🙂
It was a simple task — mundane at best. But every morning we were required to make our bed to perfection. It seemed a little ridiculous at the time, particularly in light of the fact that were aspiring to be real warriors, tough battle hardened SEALs — but the wisdom of this simple act has been proven to me many times over. If you make your bed every morning you will have accomplished the first task of the day. It will give you a small sense of pride and it will encourage you to do another task and another and another. By the end of the day, that one task completed will have turned into many tasks completed. Making your bed will also reinforce the fact that little things in life matter. If you can’t do the little things right, you will never do the big things right. And, if by chance you have a miserable day, you will come home to a bed that is made — that you made — and a made bed gives you encouragement that tomorrow will be better. If you want to change the world, start off by making your bed.
Readify is a very culturally diverse organisation: a quick scan of my inbox right now shows names like Korczynski, Mutandwa, Shah, Saikovski and The. “Tatham” isn’t exactly simple either. We’re also distributed across many different client sites spread around the country, which means a lot of our conversation is via email.
I recently came across an Aussie startup called Vame.me, via a Shoestring article. I’m a sucker for well implemented simple ideas, so I gave it a go.
This is what my email signature now looks like, with an extra “Listen” link:
I like it, not because I’m precious about my own name (I’m really not), but because I like knowing how to pronounce other peoples’. There’s been a bit of adoption across Readify already, and I look forward to seeing it grow.


You must be logged in to post a comment.