Short screencasts are a key technique in my overall communication toolbox.
I like to use them to communicate complex messages, where the background is often even more important than the actual outcome.
They allow us to share complex ideas in a way that people can consume asynchronously. As an example, right now we’re rolling out our Readify FY18 plans as a series of 10-minute chapters.
They also prevent people from skim-reading and missing context. I design the length of the video to be the time investment required of somebody. (Here’s an idea. Want an opinion? You need to invest at least X minutes of your time to hear it out first. Otherwise, you’re wasting both of our time.) Typically 5 – 10 minutes are good sized chunks. If somebody comments “I haven’t watched the video, but…“, then I’m quite comfortable to suggest that I’ll give them the 5 – 10 minutes to go and actually watch the video, and then I’ll be willing to discuss it when they’re done.
Of course, screencasts are just one communication technique. Earlier in the FY18 planning process, when there were ideas flying everywhere, we shared the content as mostly raw meeting notes and bullet point dumps. We shared with the expectation that people would skim-read at best, and that that was ok: they would call out the areas they wanted to talk about in any detail.
Previous Tools
PowerPoint’s own recording tools aren’t great. They’re designed for narrated slides, rather than a recorded presentation, and there are some subtle but awkward differences there. The prime one is that they store the audio track as a separate recording on each slide, resulting in a silent gap at each slide transition. I usually talk over the slide transitions to bridge the content, which ends up sounding terrible. It also trashes your PPTX file by putting auto-advance time stamps all through it (because that’s how they move to the next audio block).
I used to use a tool called SnagIt. It was nice and simple, with a reasonable price point (~$50), however it hasn’t progressed to the world of 4K screens. On a Surface Pro 4, this means you’re stuck with only ¼ of your screen fitting in the maximum viewport, or you have to stuff around with changing screen resolution every time you want to record.
Native Windows 10 Tools
With Windows 10, you can now produce a decent output just using built-in tools in the OS. Some of the features aren’t so obvious though, hence this post to share how I stitch them all together
In most cases, we’ll only be recording a single app – like PowerPoint, or a web browser. These instructions assume that’s the case. If you want to toggle back and forth between multiple apps, then you’ll need to fall back to a third party app like SnagIt or Camtasia.
💭 Give these steps a go as you read through this post. You’ll just record the browser here, but you’ll get to see how it all hangs together.
Quiet Hours
The last thing you need is an awkward IM during your recording. Even if it’s completely innocuous, it’ll make you stumble mid-sentence. Turn on Quiet Hours to silence those notifications.
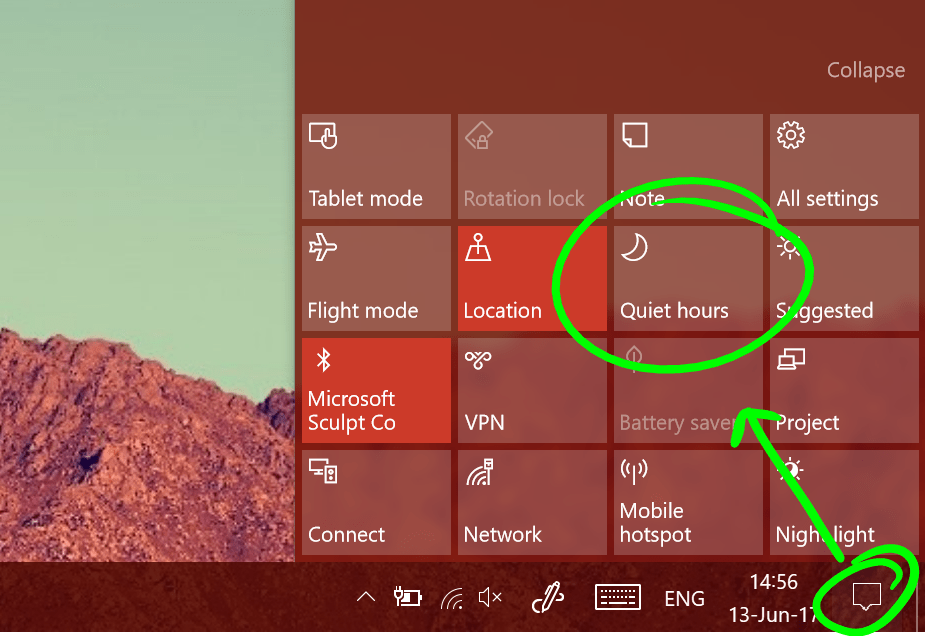
You’ll still need to exit non-Store apps, like Outlook and Skype of Business. Until they’re upgraded to the world of UWP, they just blissfully ignore this setting.
Game Bar
Windows 10 includes a built-in Game DVR as part of the Xbox integration. We’re going to trick that into being more broadly useful for us.
First, launch the app you want to record, such as PowerPoint.
Then hit ⌨ Win+G to launch the Xbox Game bar. (G is for Game.)
The first time you do this, poor old Windows is rightly going to be a little confused about you launching the Xbox controls over the top of PowerPoint:

Just tick that box to say “Yes, this is a game”, and you’ll get the full set of controls:

And now you know how I unwind of an evening. PowerPoint! Woo!
Start Recording
You’ll need to explicitly tick the “Record mic” box each time, as it’s normally optimised just to record the game audio, and not the user.
Then, just hit the big, red, record button. 🔴
The Game bar won’t be part of the recording, so don’t worry if it sticks around on the screen.
Sometimes, the “Record mic” box unchecks itself again after you start recording. Double check that it’s still checked (filled in) before you power into your recording.
Clear Audio
We’re not aiming for TV broadcast quality here, but we do want to get decent audio that’s not going to annoy listeners. With a few simple tips, you can usually achieve that without buying a special mic or stapling egg cartons to the wall.
Aim for a larger room, preferably with softer furnishings. In an office, this is probably a larger boardroom with the blinds down. At home, it’s probably your bedroom (seriously, the blankets and pillows are perfect!). A small meeting room isn’t a deal breaker, but it’ll definitely sound like you’re talking in a bucket.
Start off by clearing your throat, then saying something at a normal volume. “Hi, I’m talking to myself”. Pause for a few seconds, then start your actual content. This technique will cause the automatic volume levelling on your mic to kick in and sort itself out. We’ll trim this off later.
Sit central to the laptop that you’re recording on. Most modern laptops have stereo microphones in them, so if you talk at it side-on then your audience will only hear you side-on.
Keep the energy up. The normal pacing techniques that you’d use for a live presentation don’t apply here; they just leave people to get distracted. If it feels like you’re racing through your content and talking too fast, then it’s probably about right.
Stop Recording
Leave at last a few seconds of silence at the end. There’s no rush to stop the recording, because we’ll trim the end anyway.
If the Game bar is still on screen, you can just click the Stop button.
If it disappeared, press Win+G again to bring it back first.
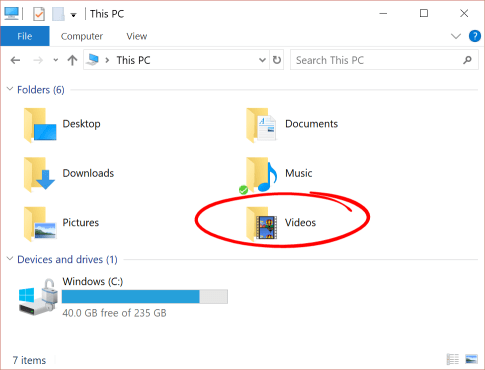
Recording Location
You’ll find the recording under Videos, then Captures.
While it was recording, Windows was just focussed on capturing everything really quickly. It didn’t want to use up CPU cycles that might cause a hiccup to the game that we were playing. As a result, the file will be huge, because it hasn’t been optimised at all. We’ll fix that next.
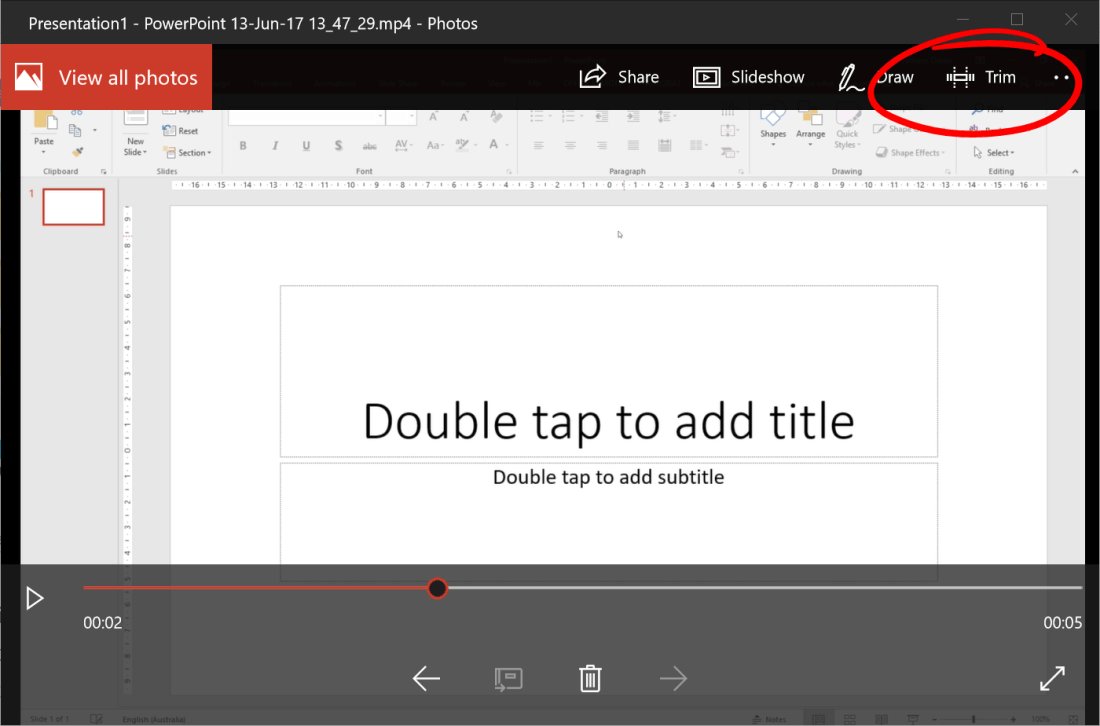
Trim + Optimize
Right click the video, then Open With > Photos. Yes, really, the Photos app, not the Film & TV app. That’s because the Photos app includes a video trimming tool:
Even the smallest amount of trimming will let you then save a new copy of the video:
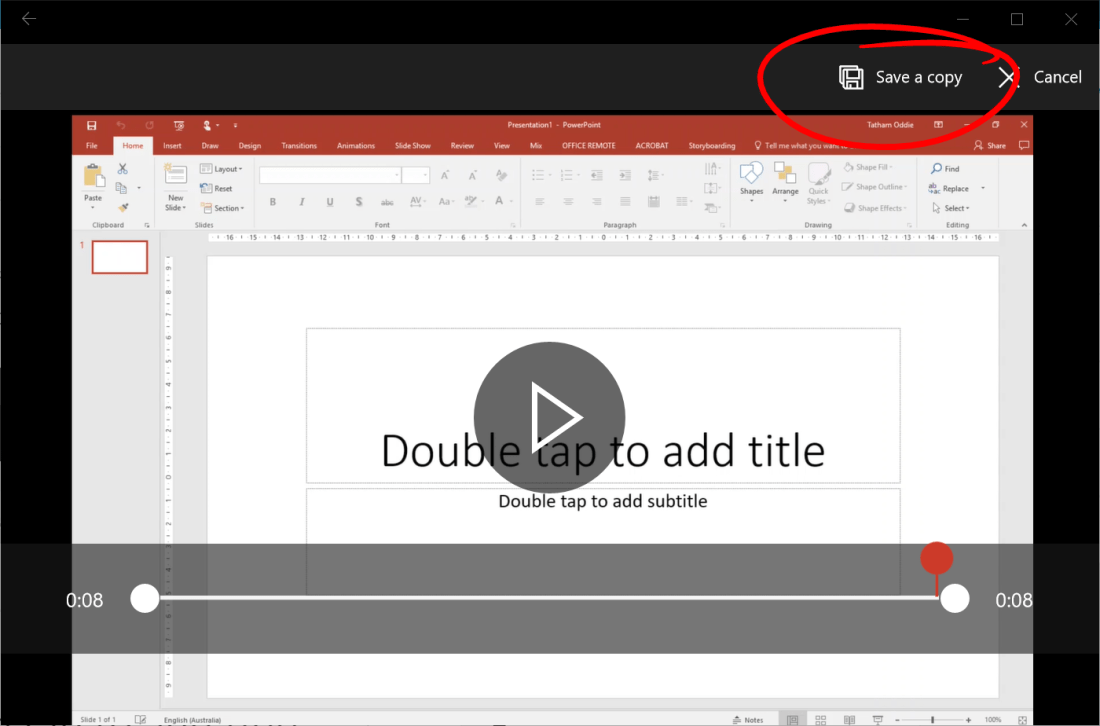
This time, Windows will work harder to generate a much smaller file. For recordings of slides and apps, you’ll generally see the file size reduce by 95% or more, which makes it immensely easier to distribute.
The smaller file will appear in the Captures folder, next to the original.
Three Takes Tops
Screencasts should be easy and natural for you to produce, so don’t make them a big event.
I like to restrict myself to three takes max:
- The first one is just a test. I know I’ll throw it away. It’s useful to test the audio, mumble my way through the slides, and think about what I’m going to say.
- The second take might be real. I try for it to be real. If I say ‘um’ or ‘ah’, it’s ok – it’s natural speaking style – and I keep going. I definitely try not to say ‘oh crap, I totally stuffed it’ because that just completely trashes the recording and forces you to restart. If this take is good enough, then we’re done and dusted. More often than not though, I stuff this one up majorly by getting slides in the wrong order, or getting my message wrong.
- The third take must be real. Any more effort than this is too much effort.
This means than a 10 minutes presentation should take ~30 mins to record. I usually book out an hour, so that I then have time left to upload the recording to Office 365 Video and post it out to Yammer.
No doubt, your first few attempts will take a bit longer while you’re learning both the tools and the style. That’s ok; just avoid getting stuck in infinite takes. Once you hit about five takes in a single sitting, it’s time to pack it up and take a break. Your voice will need a rest, and you’ll likely be muddled up about what points you have or haven’t said in any given take.
Disable Game Bar
While the game mode is enabled, even when you’re not recording, PowerPoint is running in a bit of an odd state that it’s not used to. Your whole PC will probably feel a bit sluggish.
To disable it again:
- Return to PowerPoint (or whatever app you were recording)
- Hit ⌨
Win+Gto launch the Game bar again - Click Settings
- Untick “Remember this as a game”
Then, your PC will be as good as it was to begin with.

You must be logged in to post a comment.